Integrate my subscription journey on my website
This article is intended for the following people:
Insurance / Banks Brokers / Distributors Sellers
For more information on roles on Plug, please see this article.
Offering product subscription on your site couldn't be easier!
Option 1 - Add the course as an iframe
What is an "iframe"
A iframe is an HTML tag that allows content from another server to be displayed on a web page. In your context, it will allow you to display the subscription path without redirecting the user to another URL.
Add the path to your platform
- 1
- Go to your Plug platform
- 2
- Click on My Products in the sidebar menu
- 3
- On the product of your choice, click on Actions then Parameters
- 4
- Copy the code present in Use the widget to deploy the subscription journey on any customer interface.
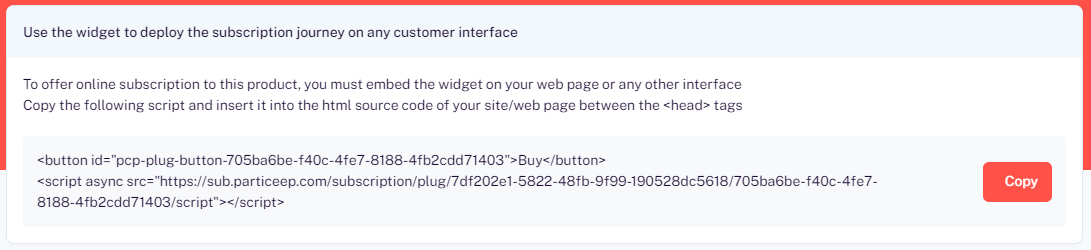
Explanations of the code:
1 - The tag <script> is your iframe path. It should be placed at the end of your HTML code, just before the tag </body>. You can follow the following steps to guide you:
- Go to your website editor
- Select the page on which you want to add the subscription path
- Add the line of code <script> to the end of your page just before the tag </body>
2- The tag <button> is the button that, when clicked, will display the subscription path on your platform. You can place it anywhere you like in your HTML code.
Example:

Additional step: Have multiple buttons to start the same subscription path.
If you want to have multiple buttons ( on the same web page) that start the same subscription path in iframe, you will need to add the following code for each new button:
<button onclick='this.addEventListener("click", PcpPlugGlobal.open("{PRODUCT_ID}"));'>{LABEL}</button>
A modification on this code will be necessary, we will have to replace the value {PRODUCT_ID} with the ID of your product. This ID is on your first button, it is the rest of the name after pcp-plug-button-.
In the example below, the product ID is 9582ecbc-ef92-4a53-be64-bd67e311f541
<button id="pcp-plug-button-9582ecbc-ef92-4a53-be64-bd67e311f541">Buy</button><br>
You will also need to change the {LABEL} value. This value is the text you want to see on your button (for example: "To my course", "To subscribe, click here", etc... )
Therefore, following the example above, the other buttons on the web page will have the following format:
<button onclick='this.addEventListener("click", PcpPlugGlobal.open("9582ecbc-ef92-4a53-be64-bd67e311f541"));'>To subscribe, click here</button>
Warning
Remember not to leave the "{}" when you put the product and label ID in the code.
Example:

Option 2 - Use the URL directly
In order to allow your users to access your subscription journey, you can also use its URL directly. However, unlike the iframe, the user will be redirected to the path URL.
To find the URL of your subscription journey
- 1
- Go to your Plug platform
- 2
- Click on My Products in the sidebar menu
- 3
- On the product of your choice, click on Action then Subscribe
- 4
- Copy the URL found in the URL bar at the top of your browser
Intermediate step
Replace the " stepX" at the end of your URL with "new".
Incorporate the link on your platform
In order to add the link to your platform, you can use the following code:
<a href="{URL}">{LABEL}</a>
You can add this code multiple times in your HTML code if you want to have different redirection points, to the subscription journey, on your platform.
Warning
Remember not to leave the "{}" when you put the product and label ID in the code.
What to do next?
Now that your subscription journey is available on your platform, you probably want to know how to track the various subscriptions on your subscription journey. To do this, feel free to go to. This page to learn more about it.